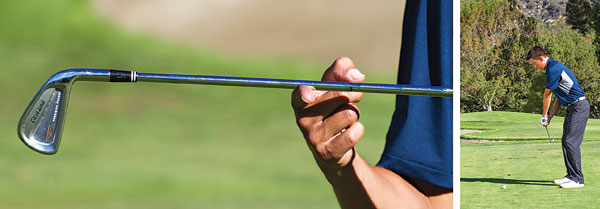
One Ball Position For All Shots
Learn Like A Pro, Play Like a Pro
Learn Like A Pro, Play Like A Pro!
Apply lasting improvements to your golf game
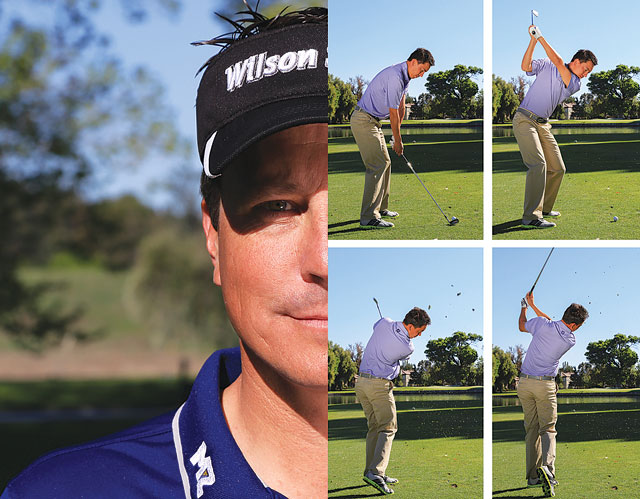
By Rick Sessinghous, PGA & Zach Allen, PGA, Photos By Ryan Noll
No matter how advanced the best players in the world become, each and every player does something, somehow, someway to make himself or herself better. No two players may practice the same way, or work on the same things, but nary will you find a player who doesn’t strive to take his or her game to the next level.
That said, ask yourself a question. When was the last time you strived to make yourself a better player? What have you done recently to start seeing real improvements? If you’re like many, you’ve probably adopted the “hit and hope” method, where instead of practicing and fixing the way you think and how you physically swing the club, you instead repeat the same mistakes and hope for better results.
Well, let’s put an end to that method once and for all. Let’s look at two ways you can get better. The first is mental, the second is physical, and both combine to help you stop wasting time on the “hit and hope” method and actually apply some lasting improvements to your golf game, just like the pros do.
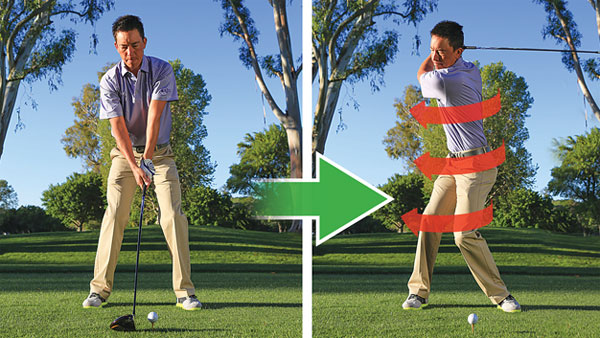
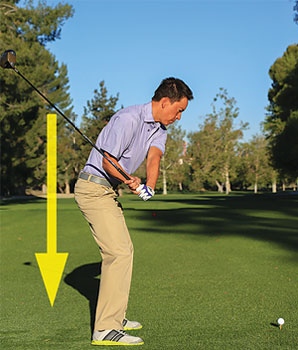
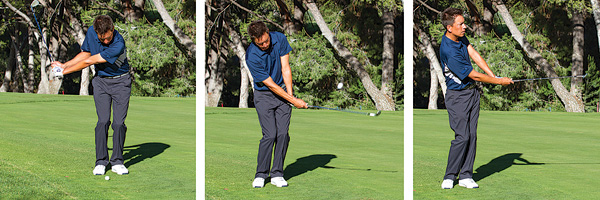
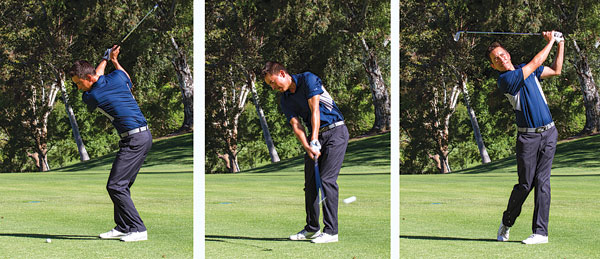
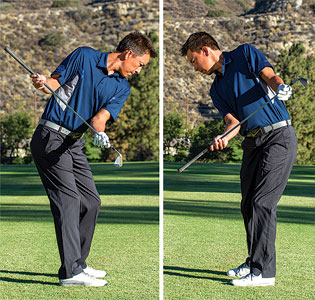
LEARN TO COIL, NOT TO TWIST
One of the most misunderstood concepts I’ve seen with my students has to do with how to coil the body on the backswing. Often, when I ask my students for a more powerful coil, I see them twist their body away from the target with little to no torque built up in their body. The top photos show what that looks like, and even though I’ve made a huge coil, I have little power because I didn’t do anything to leverage my upper body against my lower body.
 Check out my lower body here. I’ve turned so much that my right knee buckled. Despite the effort this position takes to achieve, it’s not a good one.
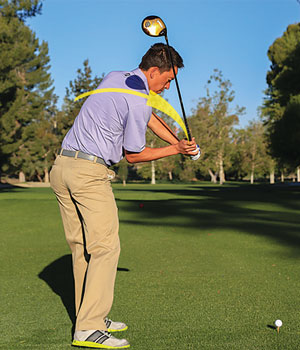
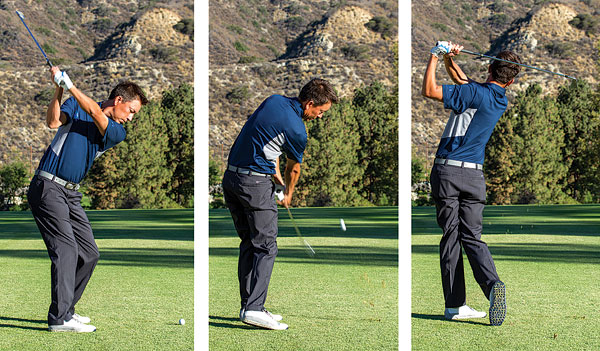
To develop a better coil, I want you to turn your upper body twice as far as your hips on the backswing, and keep your knees facing the golf ball (yes, the left one should bend) to ensure you aren’t overtwisting the lower body. Finally, keep your spine leaning toward the ball. Don’t get upright.
 This is more like it! My upper body has turned against my lower body, which has only turned about half as far as my shoulders. This is how the pros do it. Keep that back leg rigid!
TRUST YOUR DECISIONS
Once you decide your course of action, trust it! The worst thing you can do to a good swing before it happens is to fill your mind with doubt, tension and lack ofassertiveness.
Once you pick your target and the club you’re going to use, put your golf bag out of your peripheral view. The club in your hand is the only club you have at this moment, and you must trust your ability to produce good results with it. Remember, you chose this club for a reason, so stick with the plan and commit to it!
When you start second-guessing yourself, you’re not only going to limit your mental toughness, your mind will start wreaking havoc on your body’s ability to swing freely.
What’s going on in my head at this point? Not much! I have a picture of the shot I want to hit and all I’m concentrating on is getting to a full finish. I’ve already committed to my swing shape and targetline, and I’ve made my club selection. No need to steer the ball, just let it go, trust my decisions, and swing!
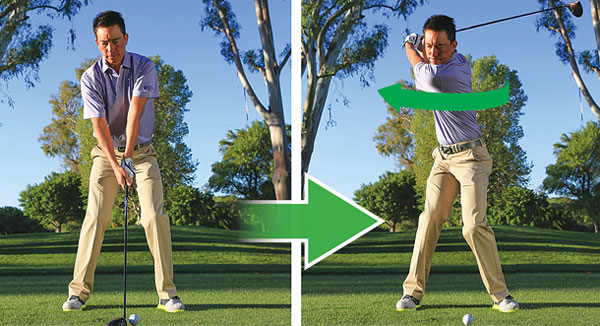
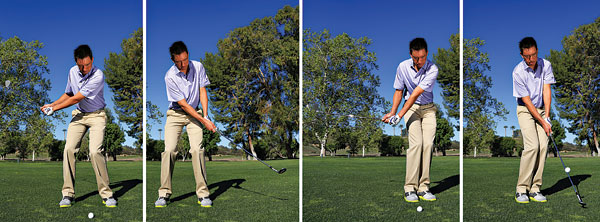
VERTICAL DROP
One position i see with virtually all tour players is this one. No matter how they take the club back on the backswing, I’d bet anyone five bucks they look as I do in the upper-left photo about one-quarter of the way into the downswing. Tour players instinctively allow the club to drop behind them as they initiate the downswing. The upper-right photo is the classic over-the-top move. Here, the upper body and lower body are overrotating, forcing the clubhead away from the body. When you’re too preoccupied with moving the clubhead down at the top of the swing, this is what likely happens. Instead, let the club drop vertically at the start of the downswing!
From the top of your golf swing, try not to get fixated on getting the clubhead back to the ball. If anything, ignore it and allow the club to vertically drop behind you as you begin the downswing. If you do that, you should look like this. If you’re fixated on the clubhead at the top of your swing, you’ll likely swing from over the top as you see here, which, by the way, rarely produces good results!
BREATHE!
Nothing replaces solid mechanics when it comes to hitting the ball a long way. But you still need to be in the correct state to allow for the swing mechanics to flow just right. Tight muscles are slow muscles, and most golfers try to increase swingspeed by tensing up, not by getting their muscles relaxed to be able to generate more clubhead speed. Hey, we’re all guilty of approaching a big drive like a wrestler and flexing our muscles, gripping the club tighter and so on. But, in reality, getting your muscles too involved actually can slow your swing down, not speed it up. You have to stay relaxed and supple!

A great way to do that is to take a slow, deep breath before every shot. This will reduce muscle tension, not to mention help calm your mind when you start getting nervous or tense over a shot. Deep breathing increases your oxygen flow to the brain and to the muscles, signaling them that it’s okay to relax.
Come time to execute a shot, take one last deep breath, then let it go and make a golf swing. Do this not just before you hit a drive, but any shot (or putt!) you face on the golf course. Tour players use deep breaths a lot—watch for them on the next TV broadcast, and pay attention to their preshot routines. A deep breath is employed by dozens of the best players in the world.
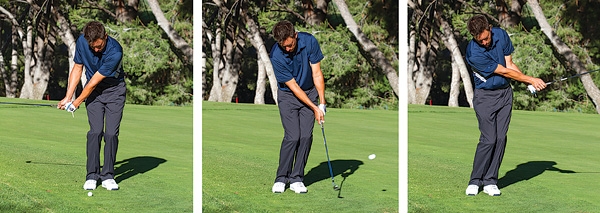
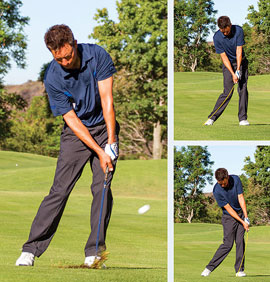
COMPRESS DON’T CONTORT!
The golf swing shouldn’t hurt. If it did, Tour players wouldn’t last very long. Take, for instance, how the body works through impact. The last thing you should do, especially with an iron, is attempt to square the clubface with your shoulders. Through the hitting area, Tour players use their forearms to square the clubface, with the back of the left hand rotating the clubface toward the target at impact. Using your forearms instead of your shoulders to square the face allows your head to remain stable and your eyes to see the clubface hit the ball. When you try and use the shoulders to square the face, you not only lose power and control, you end up placing a lot of stress on the back, shoulders and arms, which could lead to some injuries over time.
At impact, because I’m allowing my forearms to control the rotation of the clubface, I actually can see the ball leave the face at impact. When you contort and attempt to square the clubface with your shoulders, you’ll have a hard time producing good results.
The key is to trust that the clubhead will lift the ball on its own, and the forearms are what square the clubface, not the shoulders.
EVERY SHOT IS A TROUBLE SHOT
We’ve all done it. You hit a bad shot, only to face another from under a tree that requires you to thread the needle, so to speak, and hit a miraculous shot. Better yet, many of us pull that shot off more than we expect. 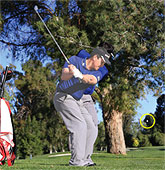
Why do most play trouble shots so well? I think it’s because when faced with trouble like this, our focus sharpens considerably. The options for the shot are minimal and we’re very limited on what type of shots we can hit and still produce good results. The trouble you may have with tree limbs, bunkers and rough makes creating a clear picture very easy in our minds. Golfers need to take this same level of visualization to regular shots from the fairway. Some golfers get lazy and just go through the motions and hit poor shots when they should learn to visualize a more limited set of options and focus more on hitting specific types of shots.
Try that the next time you play, and envision every shot you play as a trouble shot. You’ll sharpen your focus considerably.
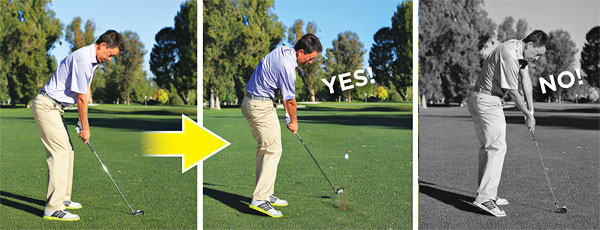
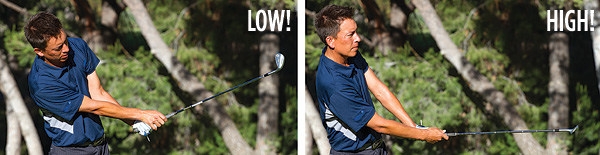
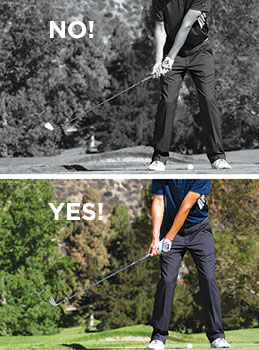
HIGH HANDS DON’T WORK
At impact, there isn’t much you can change, but there are some things you can do to help get yourself into a better impact position. A person’s hand position at impact, how high or low they are, will directly correlate to their ability to hit the center of the clubface. The higher the hands, the more off-center their impact point. The closer the hands return to the original plane of the shaft, the more centered your contact will be on the clubface. Notice in the “Yes!” photo how my hands are relatively the same at impact as they were at address. That’s what you want!

If you start your round expecting to never hit a bad shot, I have news for you, you’re going to be very disappointed. Bad shots and unlucky breaks are going to happen, sometimes more often than you expect. Be ready for them when they come, allow yourself to vent, but move on and forget about them. You have more golf left to play.
STAY IN THE NOW
I don’t wish for Tour Players to make mistakes, but I’m sure paying attention to when they hit a poor shot. Last December, Zach Johnson did the unimaginable; he shanked an iron into the water on the final hole of the Tiger Woods World Challenge. It was his second shot on the par-4, hitting the ball well right and into the water in front of the green. Now, the average player would panic and only think about not doing that shot again.
Johnson, on the other hand, refocused on what he wanted and hit a fantastic approach shot that skipped about a foot past the hole and rolled back in. The ability to bounce back from poor shots is a skill and requires golfers to focus on what they want their next shot to do, not be distracted by what could go wrong.
DON’T SWAY—SWING + TURN
Tour players limit as much movement as they can when hitting shots around the greens. Last I checked, I’ve never seen a player sway, slide or drift away from the ball, yet so often I see students of mine make slow, mini-golf swings instead of firm, crisp chip swings.
Set up with a totally different stance—feet open, heels close together—and make a swing more with the rotation of your core than with a sway or slide of the legs, body and arms. The hands should be fairly docile, the wrists should stay quiet. Any excess motion will make it difficult to hit consistent shots. And when it comes to chipping, controlling your ballflight and distance is the most important variable. You must know what swing length will produce what type of shot, and if you slide, sway or move too far off the golf ball, you’ll lose all sense of consistency, and controlling your distance will be darn near impossible.
Rick Sessinghaus, PGA, is the founder of MZ Coach, an online mental game learning center for continuing mental game success. Visit mzcoach.com.
Zach Allen, PGA, is an award-winning instructor based at DeBell Golf Club in Burbank, California. Visit zachallengolf.com.
Mistakes We Sometimes Make

What’s that thing sticking out of the back of my glove? Turn the page to find out how a tee in your glove can help you around the greens.
We all make mistakes. It doesn’t matter if you’re a Tour player or it’s your first time touching a club, we’re human beings, and we’re all prone to making errors every now and then. Out here on the practice tee, I see my fair share of mistakes. And while a big part of my teaching is on full-swing mechanics, many of my students waste strokes around the green, too. In the following pages, I’ve outlined just a few of the common mistakes I see golfers make, and I’ve brought some simple fixes to help you get back on track.
PITCH IT LOW
One of the most common mistakes I see is when my students try the hinge-and-hold approach with regard to their chipping and pitching. This means, they hinge the club going back and hold that hinged position into the finish. This shot sometimes works, but it’s a tricky one for beginners, and you actually create a lot of backspin that way. To hit a low-rolling pitch shot, allow the hands to release and the arms to rotate through the shot. To illustrate, I stuck a tee pointing out of my gloved hand. Through impact, I want that tee pointing down. Try it yourself and watch which way the tee points. If it’s level or pointing down, that means you’ll hit a low roller.
PITCH IT HIGH
Hitting a high pitch shot isn’t unlike the low one, only you release the hands without the rotation of the wrists. So, again, with the tee inserted into the Velcro® of my glove, the goal in hitting a higher pitch shot is to make the same swing, only as you release the hands, don’t rotate the arms.
This means the gloved hand will pronate (bend backward), but don’t worry. That’s necessary for applying the needed loft of the clubface onto the ball. As for the swing, it stays the same. And, by the way, creating excessive backspin when chipping is rarely a good idea. It’s too unpredictable.
EVER WONDER WHY WE SHANK THE BALL?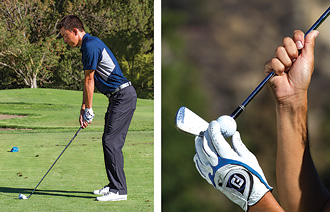
Shanked shots are the absolute worst shots in golf. A shank can happen several ways, and you can shank the ball off more places than the heel of the club. If you look at how a club is designed, it’s almost as if you’re predestined to shank anyway! First of all, the clubshaft and the clubface don’t exist on the same line. Because of it, we actually have to swing the clubshaft to the side of the ball, not directly at it. This throws some folks sometimes and makes shanks easier to do and more likely to happen. Things would be a lot easier if iron heads were situated the same way some center-shafted putters are, with the shaft pointing directly at the golf ball!
LIFT BEFORE YOU SWING
If you’re plagued with the shanks, a great drill to get your ballstriking back on track is to do what I’m doing here. The goal is to ensure the clubface won’t over-rotate too far open on the takeaway (a common fault I see in people who shank the ball). Set up to the ball as you would normally, then before you take the club back, hinge the clubhead straight up. From this position, continue the backswing with no independent hand action, meaning don’t roll the hands; instead, turn your chest away from the ball.
At first, it may seem tricky and challenging to make solid contact with the ball from this hinged position, but with practice, you’ll quickly develop a better feel for initiating your backswing with your chest, not by rolling the hands and opening the face too much.
THE CLUBHEAD IS WEIGHTED TO SHANK!
Another reason why we sometimes struggle with the shanks has to do with how an iron is weighted. Irons have the bulk of their weight in the toe, meaning the headweight is somewhat unstable as you initiate the downswing. To illustrate, think of carrying a bottle of wine upside down versus carrying it right side up. If you grab the bottle by the neck when right side up, it’s much more stable than it is when you hold the bottleneck with the top down and the bottom up.
Irons, unfortunately, require you to hold them as you would an upside-down wine bottle. This means the clubhead easily fans open going back, which means when you open the face too much, you’re less likely to square the face at impact and the ball will meet the clubhead right on the hosel.
To help create some stability, don’t feel as though the toe of the iron needs to face the sky in the early part of the backswing. If anything, better iron shots come from an iron that stays a little closed, as you see here. The reality is, by keeping the clubface slightly closed, it’s actually tracking square to the path the clubhead travels on. Also, keeping it closed a little helps you feel the clubhead more, leading to more consistent shots.

HANG LOOSE
Another problem that I see from my students is that they aren’t sure how close or how far to stand from the ball. It’s not only important in terms of how well you contact the ball with the clubface, it can affect your ability to swing freely and without hindrance. A great way to check is to note how far the handle is from your leg by using the “hang loose” sign.
Now, I know, you may look a little silly doing this, but checking the separation between the hands and your leg will help you swing the club on the proper plane. And it’s not just to check if you’re too close. If you’re too far from the ball, the “hang loose” drill will help you get a little closer without getting too close.

When situated correctly, the arms should hang vertically, and hopefully, the grip end of the club should point at or close to your belt buckle. From here, you should feel as though you’re making a free and relaxed swing, knowing you’re the right distance from the ball. Also, at impact, the hands should be, again, a “hang loose” away from the body.
Don’t miss Zach’s new and interactive ebook on how to stop shanking the ball for good! It’s available right now for download at zachallengolf.com/books.
STEP INTO IT
Almost every student of mine asks me how to hit it farther, and of the ones who really struggle with power, they struggle because they don’t engage their lower body correctly. Instead, they swing with their arms and hands, which sometimes actually can slow your swing down.
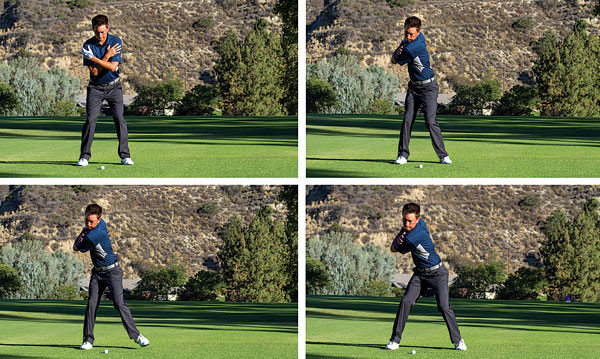
To ramp up your power, try this simple drill. Take a slightly narrower stance than normal and cross your arms in front of your chest. Next, simulate your backswing all the way to the top. Once you get to the top, the drill kicks into gear—literally. Lift your left foot and plant it firmly into the ground about 3 to 4 inches from where it originally was.

Do this drill correctly, and you’ll quickly feel as though the body not only wants to shift its pressure to the left, but the upper body will want to uncoil toward the target. After all, upper body and arm speed come from first building the foundation of the lower body for the upper body to rotate against. Practice this drill repeatedly, and you even can do it between shots to remember to drive the downswing with the lower body, not with the arms and hands. And, yes, this is true for both woods and iron shots.
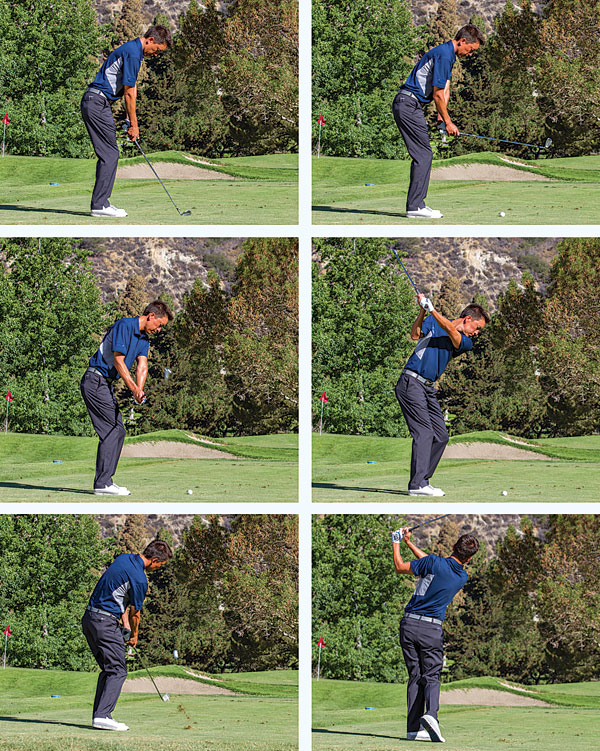
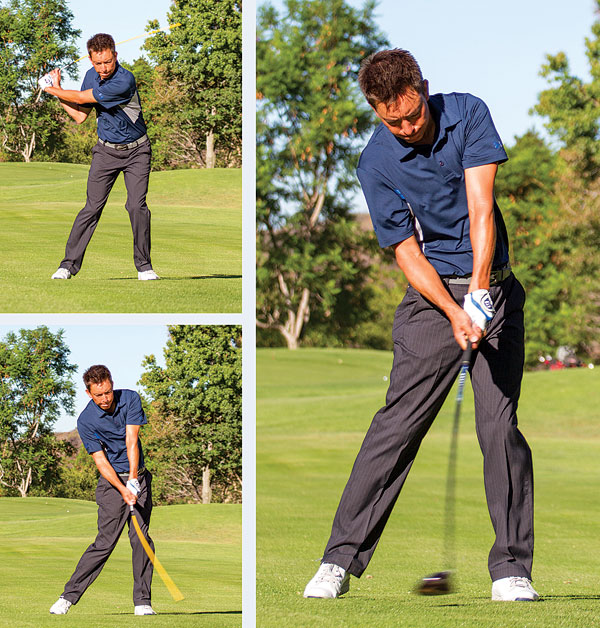
TILT TOWARD THE BALL
Another common mistake I see on the practice tee is the lack of retaining the necessary shoulder plane through the swing. You want the shoulders to stay tilted as you take the club back and through. If you come up and lose your shoulder plane, any chance of swinging the club on the proper plane greatly diminishes and hurts your ballstriking.
To practice retaining the necessary shoulder plane, practice what I’m doing here: Hold a club in front of you, and as you take the club back and through, make sure the clubhead end points toward the ball during the backswing, with the grip end facing the ball after impact.
In the sequence below, you can clearly see that I maintain the tilt in my shoulders at the top, again at impact and into the finish. There may be some variances in the exact shoulder plane, but the point is, keeping my shoulders moving on the correct plane, the club likely will travel on the correct plane, as well.
FORWARD LEAN AT INPACT
Ever wonder how and why Tour players can hit their irons so far? If you want to start hitting your irons like Rory, you have to understand what it means to stress the shaft of the club away from the target. Simply put, stressing the shaft away from the target means getting it to bow backward like you can see I’m doing with the alignment rod. Now, your actual shaft won’t bend that much, but the goal is to get it to bend away from the target as you move into impact, and when it does release, you want it to do so with your hands forward. If you can postpone that release, you’ll effectively deloft your iron and create tremendous power.
Practice with an alignment rod, feeling as though you can stress the shaft away from the target. You’ll feel as though the shaft is ready to release the more you bend it, which is exactly the feeling and sensation you want with your irons at the moment of truth. Remember, the shaft is the engine of the club, and how you control it affects your distance and control.
BACKWARD LEAN AT INPACT
Often, I see students who struggle with getting the ball airborne make steep swings with their driver. The fact is, the driver is the only club in the bag you use to ascend into the ball. To ingrain a better feel for ascending into the ball, grab an alignment stick and make a few rehearsal swings. The goal is to feel as though the low end of the stick releases as you make contact. You can see in the photos above that’s actually happening with the stick, and the actual shaft is releasing a split-second before impact, not after impact like it does with an iron. Now, whether this is a matter of a camera trick with the shutter speed or not, the point is still the same. Hitting better drives comes from hitting up on the golf ball, not down onto it. Adjust your ball position and aim so you catch the ball when the club has already released and moves up. You’ll hit higher and straighter tee shots.
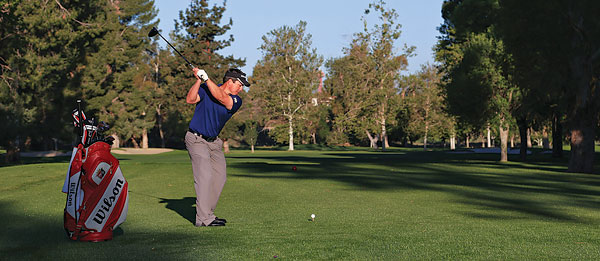
Zach Allen, PGA, teaches at DeBell Golf Club in Burbank, Calif., and was recently awarded Southern California PGA Teacher of the Year, and Best Young Teachers in America by Golf Digest